
Table of Contents
- Overview
- I/O Routing
- Clock and Sampling Rate Settings
- Network and Dante Settings
- How to use DaDman
- How to use the Avid S6 mixing console
- How to setup Pro Tools (PT HDX)
- How to connect your laptop (EXT Laptop Dante)
- Recording multi-channel Spatial Audio and Atmos
- Microphone Inventory
Overview
The Avid MTRX studio audio interface in conjunction with the Anadimo 2 AD/DA Converter is the central nervous system of the recording studio at IMV. With the Anadimo, we have 32-channel analog I/O and lots of digital I/O. All speakers and analog I/O in the studio are connected to the Andiamo and controlled by the Avid MTRX module. Inside the MTRX, the audio is also synced and routed to their final destinations. The DaDman software is the control software for the MTRX. We use DaDman to do the audio routing and decide which sound source to put on which speaker sets. Read more in the How to use DaDman section.

The recording studio features two digital I/O audio interfacing systems: the HDX for Pro Tools and a Dante network for laptop and studio MacMini sound. The heart of the studio consists of the Avid S6 M40 mixing console, which interfaces with Pro Tools and the studio Dante network.
For speakers, the recording studio consists of a far-field DynAudio Air25 (2.0) stereo system and a Genelc 8020 (2.0) near-field stereo system.

Studio Mac Software
To access all the recording studio's functionality, the following software must be installed and properly configured on the local studio MacMini.
- Avid Pro Tools + HD(X) driver
- DaDman (for MTRX)
- Dante Controller (Dante audio routing)
- iLok Manager for plugins (VST)
- Waves Central (VST)
- WSControlApp (for Avid S6 mixing console)
I/O Routing
The main priority of the current routing scheme has been to enable the best possible user experience for Pro Tools-related activities. Second priority has been given to all other DAWs and external devices, such as personal laptops. For these devices, limited I/O options are available.
Analog I/O
The recording studio features an array of high-end outboard audio gear and audio inputs from the live rooms whose signal paths can be dynamically routed to the Anadimo and Avid MTRX through various Ghielmetti patchbays.
Download the full analog I/O routing documentation here: Recording studio hardware routing 2025 - Excel
MTRX and DaDman
The DaDman routing scheme is designed to give full I/O access to the HDX audio interface and includes easy monitoring options for Dante devices (MacMini sounds and external laptops) and headphone (CUE) outputs. The most recent templates for DaDman routing and monitor profiles are stored and accessible from the "Software Settings" folder on the studio MacMini desktop.
Download the full DaDman software routing documentation here: Recoding studio DaDman software routing 2025 - Excel
Dante
The Dante network is installed to enable three things: 1) communication between the Avid MTRX and the S6 M40 mixing console, 2) audio playback from the studio MacMini, and 3) audio playback from student laptops. Four hardware devices are connected to the Dante network via wired Ethernet cables:
- The Avid MTRX
- Avid S6 M40 mixing console
- Studio MacMini via the Dante AVIO USB IO adapter 2x2 (Studio Mac Dante source)
- Student laptop via the Dante AVIO USB IO adapter 2x2 (EXT Laptop Dante source)
The Dante Controller software manages the Dante I/O routing between the two Dante AVIO USB IO adapter 2x2 devices. The default configuration for the Dante Controller routing is stored as a preset file on the studio Mac desktop in a folder called "Software Settings" for easy retrieval.
Download the full DaDman software routing documentation here: Recoding studio Dante software routing 2025 - Excel
Read more about the Dante network setup under the Dante Network Settings section.
Clock and Sampling Rate Settings
The clock leader is the Avid MTRX module (DaDman). Therefore, all other clock signals in the system should sync to the MTRX module via external sync.
By default, the MTRX adapts its sampling rate to PTH 1 (Pro Tools HDX) and is set to 48kHz. You can check this in DaDman under the Sync settings below the routing scheme.
Network and Dante Settings
Connected to the studio MacMini is a wired network to accommodate Dante. All internet services should be covered over Wi-Fi. The network system settings on the MacMini should be configured as follows:
Ethernet (Dante):
Configure IPv4: with DHCP
IP Address: 192.168.2.13
Subnet Mask: 255.255.255.0
Router: 0.0.0.0
In addition to configuring the Dante network settings, we have to ensure that the same config is used as our Primary Interface in the Dante Controller software.
Open Dante Controller and navigate to the Configure Dante Interfaces menu. Ensure that the Primary Interface IP is the same as the network settings in System Settings.

All devices connected to the Dante network have unique addresses on the same IP subnet (192.168). Here is a complete list of the Dante network IPs currently in use:
- Studio Mac Dante - 192.168.2.3
- EXT Laptop Dante - 192.168.2.14
- Avid MTRX - 192.168.2.25
How to use DaDman
The DaDman software is used for audio routing and selecting which source to send to which output configuration (speakers).
Sources available:
- PT HDX (Pro Tools HDX) → stereo source
- Studio Mac Dante (Dante 2x2 IO) → stereo source
- EXT Laptop Dante (Dante 2x2 IO) → stereo source
Outputs available:
- DynAudio Air25 (2.0) - far-field stereo
- Genelec (2.0) - near-field stereo
Start by logging into the student account on the Studio Mac. When logging in, the DaDman software should start. If DaDman does not load, start it manually. When DaDman is active, you should see something like this:

If you are unsure if the routing or speaker profile in DaDman is configured correctly, you can load two default presets to reset DaDman. To load the presets, navigate to File and select "Open". Then, choose the DaDman settings in the Software Settings folder on the desktop. After, navigate to File a second time and choose "Open profile" before selecting the latest DaDman profile from the same Software Settings folder.

Another issue might occur if DaDman does not recognize the MTRX. If this happens, navigate to Settings and select "Device List". Here, make sure that the MTRX is enabled. Second, you can navigate to Settings and choose "Monitor Profile". From here, check that the MTRX is selected as a device and that the "enable monitor" toggle is activated.
How to use the Avid S6 M40 mixing console
The Avid S6 M40 is a dynamic modular digital mixing console with 24 motorized channel faders. The S6 interfaces with the DaDman and Pro Tools software on the MacMini to help with music production workflow.

The master module on the Avid S6 features control parameters for monitor switching and talkback, but also allows users to design their own setups and custom workflows through the screen UI. The talkback button sends audio directly from a mic connected to the S6 console out of the Anadimo converter's physical outputs 9-12. These outputs correspond to the designated CUE 1 and 2 output channels for headphone monitoring monitoring.

To turn the Avid S6 on and off, hold down the power button located directly behind the master console screen. Alternatively, remove the power cable from the sockets behind the mixer. However, do not power off the console unless there are issues present.
Using the S6 console with the studio MacMini (DaDman and Pro Tools) requires the Avid WSControl software. When WSControl is opened, the connection status between the devices can be found from the WSControl application window in the Finder menubar.

Further, to use the S6 console with Pro Tools, EuCon must be enabled. To enable EuCon control, open Pro Tools and go to "Setup -> Peripherals -> Ethernet Controllers". Make sure the EuCon window is checked.
How to setup Pro Tools (PT HDX)
Pro Tools HDX is an audio interface (and hardware device) that uses DigiLink cables to send audio between the MTRX and the studio MacMini. The interface is solely dedicated to handling audio in and out of Pro Tools. The HDX hardware device is located behind the studio mixing desk.
When opening Pro Tools, you are presented with several audio settings choices. First, make sure that the sampling rate is the same as in DaDman (48Khz).

In DaDman, select the PT HDX (Pro Tools HDX) source to pass the Pro Tools audio to the speakers. Back in Pro Tools, check that the sampling rate and playback engine correspond to the sampling rate and source selected in the DaDman software, under "Options -> Playback Engine".

Finally, if you are unsure if the Pro Tools I/O is configured correctly, you can load the default I/O preset to reset Pro Tools to its normal state. Navigate to "Options -> I/O settings", then click "Import settings". Import the current default Pro Tools settings from the Software Settings folder on the desktop.
How to use CUE outputs for headphone monitoring
The recording studio is designed to accommodate monitor mixes for musicians in a very specific way.
First, open a Pro Tools session and assign a monitor send to one of the pre-made CUE 1 or CUE 2 outputs.
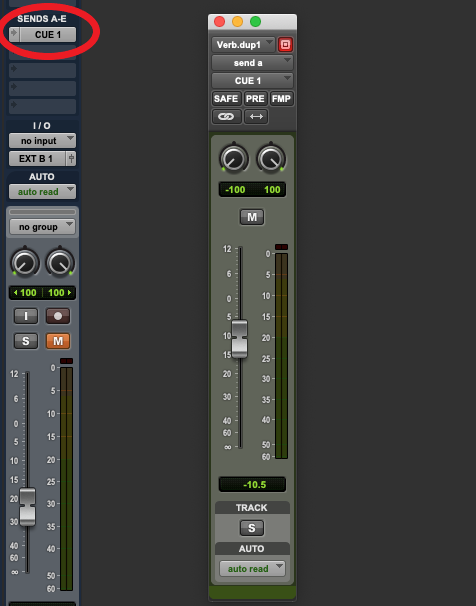
The CUE outputs are sent directly to physical outputs 9-12 (CUE 1 = 9-10, CUE 2 = 11-12) on the Anadimo AD/DA converter, not through the Ghielmetti patchbays. On the other end, outputs 9-12 on the Anadimo are connected to stereo inputs on the HP6 headphone amplifier located in the 19" rack beside the mixing desk. On each HP6 channel, users can switch between what input channels they wish to listen to.

Below the HP6 amplifier is a row of TRS connectors labeled "Headset patch (control room)". When patching the HP6 channels into the Headset patch, the audio is passed to the studio recording areas through dedicated patching panels.

Finally, a great tip is to first plug some headphones directly into the HP6 amp while setting up the monitor mixes. This way, you can check that your routing is correct before you patch the line onwards to the recording rooms.
How to connect your laptop (EXT Laptop Dante)
To use the EXT Laptop Dante source, connect your laptop to the Dante AVIO USB 2CH Adapter via USB located on the Avid S6 Mixing console. There is no need to install a driver. Simply choose the Dante speaker option on your laptop.
Finally, change the DaDman listening source to EXT Laptop Dante to get audio to the studio speakers. The Dante adapter supports up to 2-channel stereo output. For more info about routing, see the I/O Routing section above.
Recording Multi-channel Spatial Audio and Atmos
For recording multi-channel spatial audio, particularly in the Atmos format, we utilize the Grace Design SB-3D11 cube microphone array. The SB-3D11 is essentially a sophisticated microphone stand that allows 11 microphones to be mounted in a unique cube formation. In addition to the array, we have a dedicated mount and 11x SE Electronics sE8 small-diaphragm OMNI microphones.

The Grace Designs rigs are dynamic and support various other spatial formations as well, as you can see, not only the 11-channel Atmos cube. To learn more about how to set up and use the rig, download and consult the user manual provided by the manufacturer, or speak with your teacher.
The SB-3D11 and mount are located in the extra storage room adjacent to the studio. The microphones are located in the studio mic storage.
Microphone Inventory
Dynamic
| Name | # | Polar pattern | 48V/power |
|---|---|---|---|
| Shure SM57 | 3 | Cardioid | NO |
| Shure SM58 | 1 | Cardioid | NO |
| Shure Beta 52A | 1 | Super-cardioid | NO |
| Shure SM7B | 2 | Cardioid | NO |
| Audix D6 | 1 | Cardioid | No |
| Sennheiser e906 | 1 | Super-cardioid | NO |
| Sennheiser MD 421 | 3 | Cardioid | NO |
| Sennheiser MD 441 | 2 | Hyper-cardioid | NO |
| Electro-Voice RE20 | 2 | Cardioid | NO |
Small Diaphragm Condenser
| Name | # | Polar Pattern | 48V/Power |
|---|---|---|---|
| Neumann KM-184 | 2 | Cardioid | YES |
| Neumann KM184 p48 | 1 | Cardioid | YES |
Schoeps CMC 6 MK 4 | 2 | cardioid | YES |
| Violet Black Finger | 2 | Cardioid | YES |
| SE Electronics sE8 | 12 | OMNI | YES |
Large Diaphragm Condenser
| Name | # | Polar Pattern | 48V/Power |
|---|---|---|---|
| Brauner VM1 | 1 | Optional | Tube/Custom |
| Brauner Phantom Classic | 2 | Cardioid | YES |
| Neumann U87 Ai | 1 | Optional | YES |
| Neumann U67 | 1 | Optional | Tube/Custom |
| AKG C414 | 4 | Optional | YES |
| SM Pro Audio MC03 | 2 | Optional | Tube/Custom |
Ribbon
| Name | # | Polar Pattern | 48V/Power |
|---|---|---|---|
| Royer R-121 | 2 | Figure-of-8 | NO |
| Royer R-122 | 3 | Figure-of-8 | YES |
| SM Pro Audio MC04 | 2 | Figure-of-8 | NO |
Extra (storage next door)
| Name | Type | # | Polar Pattern | 48V/Power |
|---|---|---|---|---|
| DPA 4011-TL | Condenser | 2 | Cardioid | YES |
| DPA 2011-TL | Condenser | 2 | Cardioid | YES |
| Sennheiser speechline | Condenser | 2 | OMNI | NO |
| Behringer C-1 | Condenser | 3 | Cardioid | YES |
| Behringer C-1 USB | Condenser | 3 | Cardioid | NO |
t.bone EM 9600 | Condenser shotgun | 3 | Super-cardioid | YES |
| t.bone EM 9900 | Condenser shotgun | 1 | Hyper-cardioid | YES |
| Beyerdynamic MCE530 | Condenser | 2 | Cardioid | YES |
| Catchbox system for online communication | Condenser | 1 | OMNI | NO |