
Equipment
In Salen, we have all the necessary equipment to stream high-quality audio and video online or just record. Follow the instructions below to see how to set up and use the system.

The streaming station includes:
- 2x wall-mounted Panasonic AW-HE40S cameras
- Panasonic AW-RP50N camera controller
- Sony MCX-500 video mixer
- 2x wall-mounted TV monitors.
- Stationary UiO PC
- HDMI - USB video grabber
- PTN SC51T scaler (Teaching desk) - https://kiertonet.fi/liitteet/163605/PTN%20SC51T%20manual.pdf
1.Getting Video From The Panasonic Cameras and Controller

The Panasonic AW-HE40S cameras are remote-controlled by the Panasonic AW-RP50N camera controller via IP. The cameras and the controller must be connected to the correct physical ports, to the controller's "TO PAN/TILT HEAD" connectors via their RS-422 ports.
Turning the controller on/off
Now, power on the controller. Ensure that the LEDs above the "CAMERA STATUS/SELECTION" buttons are either orange or green.

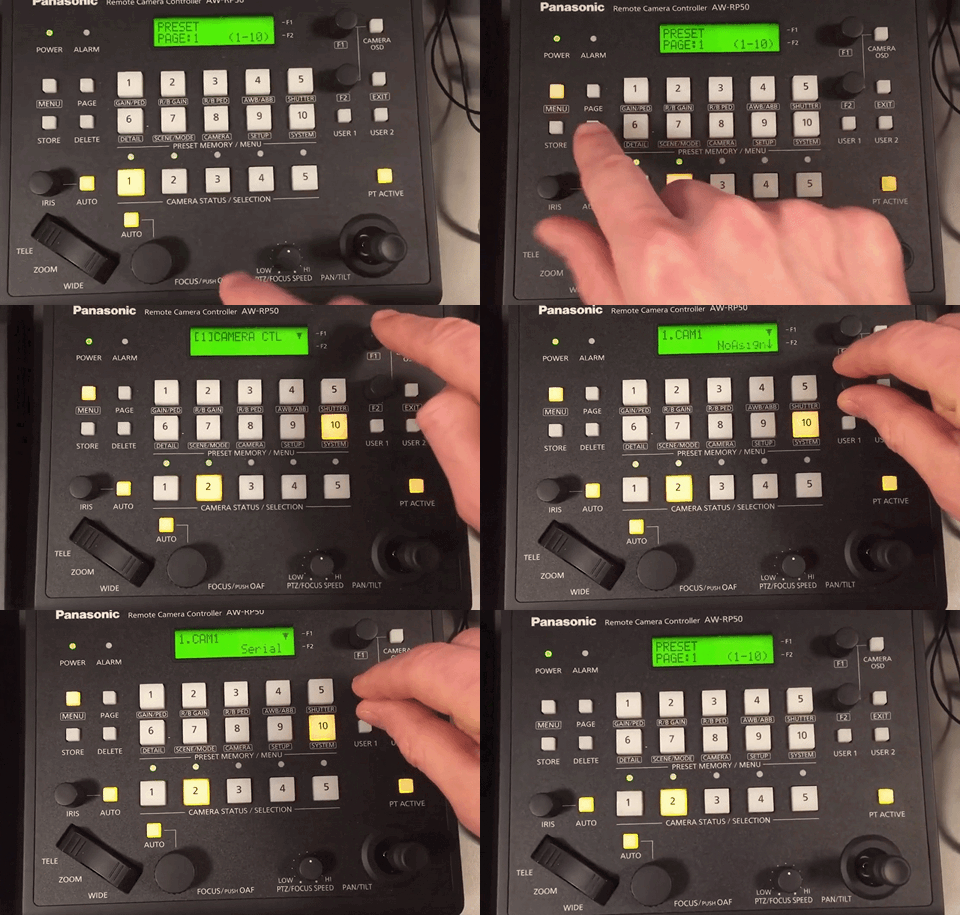
If there is no light above these buttons, we must set the correct IP configuration for the camera inputs on the controller. We do this by:
- Selecting the desired camera on the "CAMERA STATUS/SELECTION" panel
- Pressing menu
- Pressing button nr.10 called "SYSTEM"
- Navigating to the "CAMERA CTL" in the UI via the F1 knob (scroll and press).
- Navigating to the "1.CAM" section and selecting "serial" using the F2 knob (scroll and press).
When the correct IP configuration has been made, the LEDs above the "CAMERA STATUS/SELECTION" buttons should be either orange or green.
Turning the cameras on/off
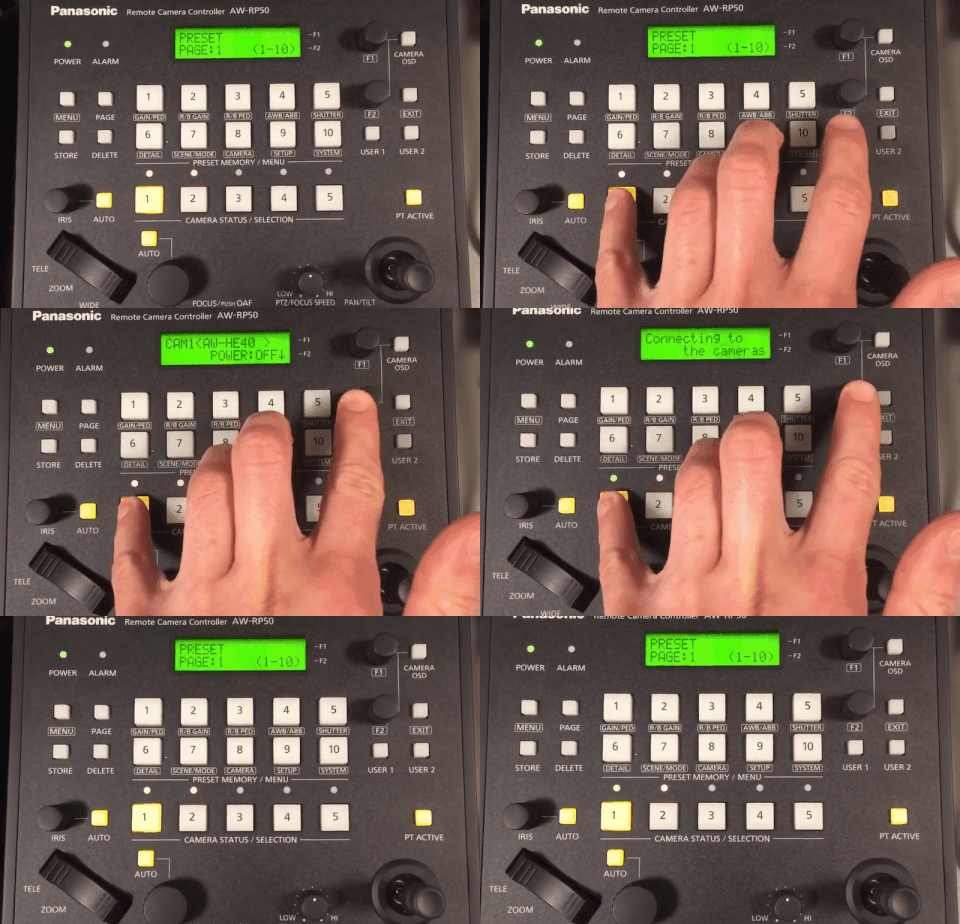
Now it's time to turn the cameras on. Simply press and hold the desired "CAMERA STATUS/SELECTION" button until "Cam1<AW-HE40" is visible in the UI. Then, while holding the button, use the F2 knob to scroll to "ON" and press the F2 knob to confirm. The LEDs should now turn from orange to green, indicating a successful connection.
2. Getting Audio From The MIDAS M32 Mixer
The easiest solution for capturing audio for a live stream in Salen is to connect an output bus from the Midas M32 mixer into the dedicated XLR audio inputs located on the back of the Sony MCX500 video mixer via XLR cables.

If you are recording a concert, you can use the "stream 2" scene on the Midas M32. This scene is set up specifically for concerts, with audio outputs 11 and 12 already set up as a secondary Master LR output to connect to the Sony mixer.
3. Mixing Everything On The Sony MCX500 Video Mixer
We use the Sony MCX500 mixer to preview and mix between video feeds during an event, and finally to broadcast that mix to a computer for streaming or recording purposes.

The Panasonic cameras are connected via SDI to inputs 1 and 2 on the Sony mixer. To configure the input channels on the mixer, simply press the "assign" button and navigate "video input select" row B. Then, choose the desired input ports for each AV channel in the mixer UI.

The top wall-mounted monitor is connected to the mixer for previewing purposes. The monitor is connected to the "MULTI-VIEWER" output, which gives us a visual preview of our camera feeds and current output to the streaming computer (PGM). The mixer is connected to the stationary UiO streaming PC via the "PGM" HDMI port.
For more advanced configurations, like custom internal routing, connect your laptop/PC to the "PC UI" port. See the hardware manual for more documentation on this procedure.
For audio, enable the "LINE" channel button and adjust volume accordingly. Line audio input is the XLR cables plugged into the MCX mixer. On the other hand, if you have audio embedded on one of the video channels, enable the appropriate channel number button below where it says "AUDIO ACCESS".

You can monitor audio by connecting a pair of headphones to the headphone port at the front of the mixer. Finally, ensure that the MCX500 is selected as the sound source in the streaming software.
4. Streaming Content to YouTube With OBS
On the streaming computer, log in to the desired YouTube account. From here, schedule or start a video stream and copy the assigned Stream Key (strømmenøkkel).
Now, in OBS, go to "Settings -> Stream" and enter the stream key or connect your YouTube account. (The specifics of this step might change in later versions of OBS and YouTube, but the principle is the same).

With this, you should have a connection between YouTube and OBS. Remember to monitor audio levels and select a suitable resolution and Bitrate for your stream. More info on streaming with YouTube and OBS can be found online.
5. Grabbing the Projector Image From The Teaching Desk In OBS
Whatever image/screen is sent to the main projector in Salen from the teaching desk is also available on the streaming PC at the streaming station. This way, presentation content can be streamed separately from the camera feeds, ensuring a better quality streaming experience.
The teaching desk HDMI feed (which is just the HDMI output connection from the Scaler in the desk) is provided by an HDMI to USB grabber, outputting from the teaching desk to the streaming PC.
.png)
6. Just Record Video and Audio (No streaming)
The best way to record video and audio is to use an SD card.
Insert a standard-size SD card into the slot on the front right of Sony MCX 500. The monitor screen should show information about the SD card being inserted, and how many minutes you can record that are left. Make sure your audio is working. Press the RECORDING button on the console to bring up the recording menu, and press Record on the touch screen to start your recording.

If you are recording a concert, you can use the "stream 2" scene on the Midas M32. This scene is set up specifically for concerts, with audio outputs 11 and 12 already set up as a secondary Master LR output to connect to the Sony mixer.